Monday, January 24, 2011

Valentine Blog Hop Card

Here's my entry in the Blog Hop
at enjoymichaelstrongstamps yahoo group.
If you would like to know how I made this card,
read the post below.
Please hop over for more inspiration
to my friend Thea and see her entry.

Mosaic Tile Valentine's Day Card


Another accidental discovery led to this technique for making faux mosaic tiles. I spilled a little embossing powder onto a piece of foam mounting tape and I noticed that it stuck. Naturally, I heated it to see what would happen. I was amazed that the heat from my heat tool did not melt the foam tape and that the embossing powder melted onto the foam. I covered the whole strip of tape with more powder and heated it, thus discovering a way to create mosaic “tiles” that are easy to make, fun to use and weigh very little. Perfect for Scrapbooking and card making.

Materials:

Scotch brand foam mounting tape (can be found in any office supply store)
Black cardstock
Gold cardstock
Cream cardstock
Paper cutter
Scissors
MSRS Cloisonné Heart Stamp
Versamark Inkpad
Variety of embossing powders (I used: from MSRS, Desert Fire, Desert Rain, Pearlescent Ivory, and Mirror Gold and from Judikins: Rustique Jade)
Heat Tool
Double sided tape or glue

Steps:

Cut several lengths of foam tape (approximately 3 – 4 inches long). Place one sticky side up on a folded scrap of paper. Sprinkle on some embossing powder to cover. Shake off the excess powder and use the folded paper to put the extra back into the bottle. If you decide to use more than one color on the strip, sprinkle the powder in a few areas and fill in the remaining areas with another powder. You will have mixed powder left over. Save this as a custom blended powder! Continue until all the strips have been covered.
Heat the strips one by one with a heat tool until they are all melted and cooled.
Use scissors to cut random sized and shaped “mosaic tiles”. Set aside.

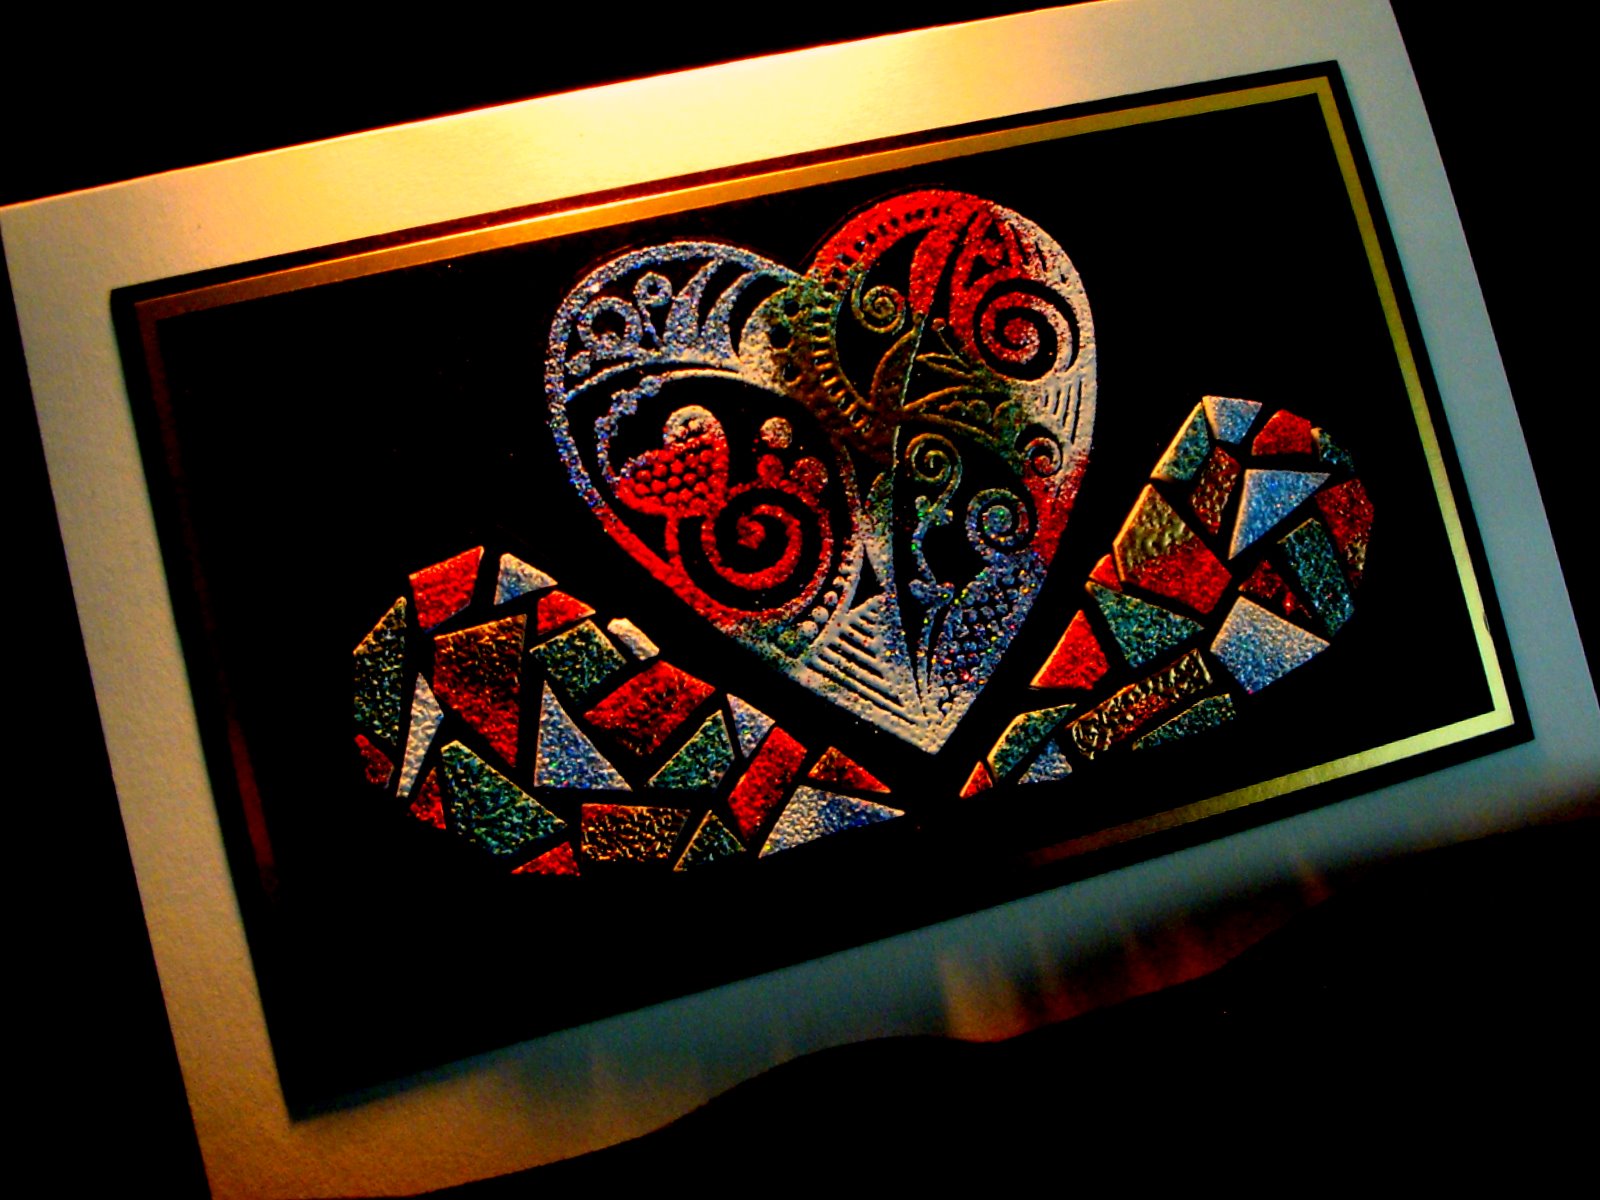
Stamp the Cloisonné Heart onto a piece of black cardstock using Versamark ink and any embossing powder. Heat until embossed. Cut the heart out and then cut it in half lengthwise as shown. Turn the halves over and begin filling them in with tiles by peeling the backing off and sticking them in place.

Stamp the heart again. This time, sprinkle on the same embossing colors used on the tiles onto random areas of the design. Save the mixed extra to your custom jar of powder. Heat to emboss and cut out.
Assemble the card with tape or glue by mounting the two mosaic half hearts and the multi-color heart as shown with the multi-colored heart emerging from the two mosaic halves. Mount onto a gold cardstock frame and a black frame as shown and place on a folded cream colored card to finish.


Tuesday, January 18, 2011

Sweet Thank You Candy Tray


Here's a super simple project for anyone needing a lot of party favors. Carla and I made 200 of these today for our daughter's wedding reception. We used the same cardstock her wedding invitations were made from. Her colors are purple and silver, so we used the Hershey Kisses in those colors - perfect!

Materials:

Cardstock (for tray)
Cardstock for mat)
Cardstock (for printed text insert)
Contrasting cardstock for punching
Paper cutter
Scoring tool
Heart punch
Glue stick
Candy

Steps:
Using your own computer and printer, print the message of your choice. Copy and paste the
message to fill the page. Be sure to use a font size small enough to fit within
a 1 1/2" x 1 1/2" square. (I was able to fit 12 messages onto one sheet of cardstock). Set aside.
Cut as many 2 3/4" squares as you need. These will be the trays.
Cut the cardstock mats into 1 3/4" squares.
Using a scoring tool, score the the trays at 1/2" on all four sides.
Cut away the small squares at each corner and fold the sides up to form a tray.
Glue in the mat.
Trim the massages to 1 1/2" square. Glue the message to the mat.
Punch as many decorative shapes from the contrasting cardstock as needed for each tray.
I used one small heart for each tray.
Glue the punched design to the inside of the tray as shown.
Add candy and enjoy!
Posted by Picasa

Saturday, January 1, 2011

December card challenge winners!

 
Here are the winners of our December card challenge. Congratulations ladies!
Little Christmas card Winners!

Trena Brannon – USA
Trena has designed a frosty forest scene in a compact little snow globe. Her limited palette of blue and white makes just the right wintry statement. Notice her judicious use of the Ice White Pearl Pen. She has expertly made decorations on the trees, falling snow and drifts of snow on the ground. I love this joyful card. Well done Trena!

Cary Buckham – United Kingdom
Clever Cary has managed two design elements which are difficult to combine successfully, whimsy and elegance and yet here they reside together with ease. There are many lovely things about this little card from the tiny stitching along the border to the precisely cut Reindeer mounted on the clear acetate panel. Her muted palette is enlivened by just the right touch of glitter. Well Done Cary!

Dorly Weitzen – Israel
Here is another WOW card from Dorly! She has shown us that a simple idea can yield breath taking results. She has used dozens of tiny punched branches to form a spectacular little tree. I love how the card opens to reveal yet another surprise inside, a bright red Christmas tree – so unexpected and so Dorly! Well Done!

Posted by Picasa