Saturday, December 29, 2012

Embossed Owl with Owl Flower Panel


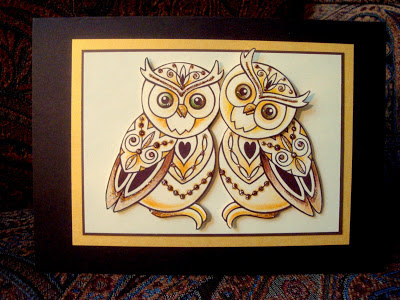
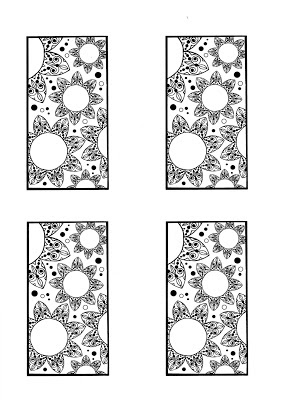
Here is the first embossed card I made with one of my new Owl stamps. I also designed the background panel using a portion of the owl's wing to form a flower. You can print the panels below for your own use. There is also a tutorial on how I got the look using a free Goolgle program called Picasa. Enjoy
Posted by Picasa

Owl Flower Background Panels


How to manipulate the look of your background panels using Picasa by Google

If you don’t have Picasa on your computer, go to www.picasa.google.com and click the “download Picasa” button.


Copy and print the “Owl Flowers” background. Lay the copy on your flatbed printer.


Open the Picasa program and click the “import” button in the top left corner. You will be given a choice of locations to import the picture, choose your printer by clicking on the name of the model you are using.


A dialog box will appear asking you “what do you want to scan?” Choose black & white picture or text and click the “scan” button.


Your printer will begin transferring the image to your Picasa program, this may take some time. When the image appears on your screen, click “import all or import selected”. This action will import the image. Double-click the image and it will transfer to the tools screen. Here is where you get to have some fun with the image.


On the left you will see a long rectangular box with five tabs at the top used for manipulating your photos or images. They are:

1 Commonly needed fixes (wrench icon)

2 Finely-tuned lighting and color fixes (Sun icon)

3 Fun and useful image processing (paintbrush icon)

4 More fun and useful image processing (Paintbrush icon w/green background)

5 Even more fun and useful image processing (Paintbrush icon w/ blue icon)


Click each tab to see the different things you can do with each tool. Experiment with some of the tools to get the feel of the program. Remember you can always un-do anything by clicking the “un-do” button.


Here is how I got the look of the background you see in my sample card.


Click the “More fun and useful image processing “ tab

Scroll down to the Duo-Tone tool and click it.

Click on the “second color” button first. This will establish your background color. Move the eye dropper tool around the color spectrum until you find one you like. Remember, not too dark, this is the background.

Now click the “first color” button. This will color the flowers. Move the eye dropper tool around until you find a color you like and click it.

Click the “apply” button to save this combination.

Click the green tab again and choose the “Lomo-ish” option. This will give your panel a more intense color and create shadows around the edges.

Go to the center bottom of the page and click “print”

You will be able to choose the size and number of images you want to print onto your white cardstock.

Have fun!
 
Posted by Picasa

Friday, December 21, 2012

Best early Christmas present ever!


Here is Hannah Colleen Macke born 12-20-12 7lbs. 7 oz. 19.5inches, our new little Granddaughter.
Mom Amanda, Dad Max and baby Hannah are all doing well. 
Posted by Picasa

Tuesday, December 11, 2012

Cloisonne Pot Background

 
 I made a background panel using design elements from the Cloisonne pot. This is card we'll be making in my "Pot Party" class at Scrap N Yap on Saturday. Print out the panels on cream colored cardstock to get a look similar to the sample card.
Posted by Picasa

Sunday, December 2, 2012

Lilly coloring


lower left - not happy her crayon broke!
Posted by Picasa

December Card Making Challenge

 Here is the Christmas tree silhouette for you to use on your December challenge card. Have fun!
Posted by Picasa

Tuesday, November 27, 2012

Little flower Box


The card in the middle features a flower box based on the McDonald's French Fry container. Print them out below and copy to any color cardstock, cut out, score on the dotted lines, fold up and glue the side tabs together. 
Posted by Picasa

The little french fry box template X4

 
Posted by Picasa

Saturday, November 24, 2012

Wednesday, November 21, 2012

Look WHOO just dropped in


Our owls are on the way! You can order them beginning on Black Friday (Nov. 23) for delivery in early December when they will be ready to fly your way. Extra bonus - free shipping on Black Friday straight thru Cyber Monday (Nov. 26) on anything you buy plus a fun free gift with each order. Happy Thanksgiving from all of us to all of you!
Posted by Picasa

Friday, November 2, 2012

October Card Making Challenge Winners!

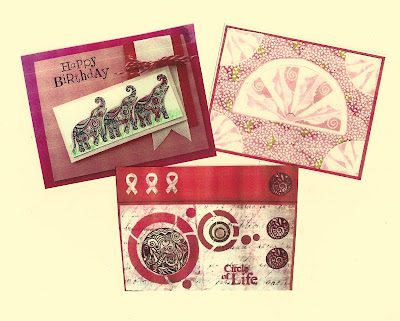
Here are our three "Pink" challenge winners. Sorry to say I do not have the names of two of our winners, only their Yahoo group name. Top left is the fantastically colored parade of pink elephants    here to wish someone special Happy Birthday. This card was submitted by Sphu07. At upper right is a lovely soft pink card with a fan motif. The coloring is especially sensitive. This is from Bert9600 The card at the bottom is not a card at all but a wonderful box with an inspiring message by Herma Fichte. Thank you all for your beautiful work! 
Posted by Picasa

Thursday, November 1, 2012

Blog Candy winner!

Hi everybody, I hope you had a great Halloween! We sure did! We gave all the names in this give-away a number and picked one at random and the winner was Sarah Stainback from Chatham County North Carolina. Congratulations Sarah!

Thursday, October 25, 2012

All Treats No Tricks!


Here is a fantastic collection of my favorite glitter pens made by Viva Decor. I LOVE them and I know you will too. Just make a comment on this blog post and you may get them for Halloween! On October 31, I will choose a winner at random and drop them into your trick or treat bag. Happy Halloween!
Posted by Picasa

Wednesday, October 17, 2012

Halloween Fun From a Friend


My friend, designer Judi Kauffman fell in love with my new Halloween Confetti dies and shared two cards she made that feature them. She chose speckled black cardstock (she thought the speckles added an extra bit of creepiness). Those itty bitty sparkly red eyes on the crows, spiders, bats, and cats are the smallest size on the Glitter Dots peel-off sheet from Elizabeth Craft Designs (there are four sizes and several hundred dots per sheet).  The sparkly spider webs are Black Iris Shimmer Sheetz embossed with Tim Holtz's Sizzix folder. The embossed words, also one of Tim's folders, were smudged with StazOn to highlight the letters.  She toned down some of the sparkle on the Shimmer Sheetz with StazOn (Tsukineko).  Super fast, very easy. Thanks Judi I love them!

 
Posted by Picasa

Monday, October 15, 2012

spooky spidery backgrounds

 
 Here are two Halloween backgrounds for you to use with the new Spooky Silhouette stamps and Halloween Confetti Die Cutters. Have fun!
Posted by Picasa

Friday, October 5, 2012

Cooling Down

 
 After a long hot summer my thoughts are turning to the cool wintertime weather in San Diego. Here are some cards we will be makng in my upcoming class called "Shades of White"
Posted by Picasa

Wednesday, October 3, 2012

The Birds!


A Halloween homage to Alfred Hitchcock.
Posted by Picasa

Tuesday, October 2, 2012

September 2012 Card Challenge Winners!

Congratulations to the three ladies who won the September card making challenge. They are at the top Henriette Wijers-Metes, lower left, Martha Bickford and lower right, Lori Rife. Thank you for your beautiful work! Thanks to everyone who entered the challenge, I appreciate your effort and our members love the inspiration! 
Posted by Picasa

Blog Candy Winners! - Wishing you a Purr-fect Halloween


Here are the lucky winners of the Halloween Confetti Die Cutters: Loes Pasteuning, Julie Heyer and Patty Hebert. Congratulations! Thanks to one and all for joining in the fun.

Here's how to make this card:

Supplies:
Black cardstock
White cardstock
MSRS Halloween Confetti Die Cutters
3" circle hole punch
2" circle hole punch
Cuttlebug or any other embossing machine
glue
Paper cutter

Steps:

Cut a 6 1/2" x 7 1/2" piece from the black cardstock and a 6 1/2" x 6 1/2" piece from the black cardstock. Score the 7 1/2" piece at 1" and fold down. Put glue on the 1" folded tab and glue the 6 1/2" x 6 1/2" piece on top to make a 6 1/2" x 6 1/2" square card.
Cut two 6" squares from the white cardstock. Center one on the front of the card and one on the inside as a liner.
Die cut 12 black cats and set aside.
Punch out a 3" round from the black cardstock and a 2" round from the white cardstock .
Glue the cats by their feet all around the black cardstock as shown. (I spray glued the finished "circle of cats" on the back and glued it down to the front of the card.)
Add the white circle to the center of the black circle and glue one more cat inside the circle. Feel free to make your own variations and add your own style to this basic design. Have fun!


Posted by Picasa

Thursday, September 27, 2012

Blog Candy!


Hey, it's my birthday on Monday but you get the presents! On October 1 I'll choose three numbers at random and those people win a set of my new Halloween Confetti Die Cutters! Just make a comment on this blog post for your chance to win. Good Luck!
Posted by Picasa

Tuesday, September 4, 2012

Monday, September 3, 2012

Fun in the Sun Winners!

Here are the three winning card from the Fun In The Sun challenge at EnjoyMichaelStrongStamps yahoo group.They are Birgit Edblom (top), Barbara Inserson (lower left) and the thrid card was submitted by SophieNo1984. I can't find the name for this one so please email me with your name and address. Thank you for submitting such great and clever cards! I will also post these on our Facebook page.

Tuesday, August 14, 2012

August Blog Candy winner!

OOPS! I forgot to announce the winner. Congratulations to Judy Inukai of St. Louis. Your elephants will be stomping your way today Judy. Thanks to all who took the time to comment.

Thursday, August 2, 2012

August Blog Candy!

Here's some exotic candy for you, my new Cloisonne Elephant stamp set!
This is an exclusive offer to members of my yahoo group only.(enjoymichaelstrongstamps@yahoo.com) Simply make a comment on this blog entry for your chance to win the new stamp set, two complete card kits, Mirror Gold embossing powder and and autographed card made by me =). One person will be chosen at random on August 10. Good luck to all the members! 
Posted by Picasa

Wednesday, August 1, 2012

Fun in the Sun!

Hi hoppers! 

Here's my beach card for the Summer Blog Hop.
 I used Orient Express embossing powder
and Platinum Inka Gold on the sea creatures.

 
The embellishment on the bottom is my "Beachy Sand" sprinkled
on a line of liquid glue.
 
Please follow the blog trail and go to
Rosie Guiher
 http://gramig05-playtime.blogspot.nl/2012/07/michael-strong-blog-hop.html

Happy Summer!
from Mike 
 
Posted by Picasa